
~
Greetings, and welcome back.
I'm in the process of moving this blog to a new location. Posts located here have been imported to the new site. I will maintain the articles I've already written here so that links from existing websites will still work.
Please visit http://robhanson.wordpress.com for all future entries. To go there now, click here: Take Me to the New Blog!
It's prettier. I think you'll like it.
Thanks for your patience!
Rob
Sunday, July 25, 2010
Wednesday, July 14, 2010
HDR Expose from Unified Color: A First Look
Hi, again --
Glad you stopped by.
What follows is a 'first look' at a new HDR program
Full Disclosure: When I first published this entry on July 14, 2010, I had absolutely no affiliation with Unified Color. I am now somewhat affiliated, in that I can offer a 20% discount on all Unified Color products. Just use the discount code "ROBHANSON" when you check out. Please note that this discount does not apply to the current promotional pricing of $99 for HDR Expose, which runs until the end of July, 2010.
Full Disclosure: When I first published this entry on July 14, 2010, I had absolutely no affiliation with Unified Color. I am now somewhat affiliated, in that I can offer a 20% discount on all Unified Color products. Just use the discount code "ROBHANSON" when you check out. Please note that this discount does not apply to the current promotional pricing of $99 for HDR Expose, which runs until the end of July, 2010.
On Monday, July 12, 2010, Unified Color released a new version of their HDR processing program, now called HDR Expose (as in "exposure.") This represents a significant update of their previous program, HDR PhotoStudio 2. With a completely new interface, a new histogram function, and new features -- especially those in the anti-ghosting and anti-halo areas -- it's enough of a departure from the previous product that it probably deserves the new name.
I've only had a little bit of time to play around with HDR Expose, but... so far, so pleased. I believe it represents a huge step forward for Unified Color, as the interface is far more intuitive and useful than the last version. Although I liked HDR PhotoStudio 2 well enough, it was sometimes a bit of a mystery in my struggles to contain the final output.
For those who would like the bottom line: If you'd like an alternative method for processing HDR brackets, and if you'd like a more 'realistic' look than what has so far been generally available in HDR/tonemapping programs, this is a great choice. At an introductory price of only $99, or a free upgrade if you're an existing HDR PhotoStudio 2 user, you really can't go wrong.
Simply put, HDR Expose is great at producing realistic, true-to-life images from multiple exposure brackets. You can still pass a single exposure through it, and you can work with most file formats, including .hdr, .exr, .bmp, and others. It has the added benefit of editing everything in 32-bit precision, so all that wonderful information is kept intact until you render the final image down to LDR display (typically 8-bit JPG for most web usage), or pass the 32-bit output to another program for further editing.
Don't get me wrong. I love programs such as Photomatix Pro 3.0, and I'm looking forward to the update to version 4 of that product. Lately, however, I've been doing a lot of real estate and interior shoots, and I've found that since the clients don't give much artistic latitude for personal expression, having a program that strives for realism is a big plus. It's fairly easy to go "over the top" with some programs (a common hit that HDR processing tends to take) and this helps reign in that impulse.
As far as I've seen, the new HDR Expose also helps to tame some problems that I wasn't able to address before.
Let me walk you through the new program for just a short ways. I'm going to show an image that gave me a lot of trouble using Photomatix and Photoshop CS4 -- probably the most problematic image I've yet processed -- and how the new HDR Expose seems to address those issues very nicely.
We'll take a 9-exposure set, merge it to HDR in the new HDR Expose program, and then make adjustments up to a certain point. (Perhaps I'll have to write a "second look" entry sometime later.) You may recognize this image as being the Tuscan-style house remodel that my wife and I worked on last year. We did the decorative plaster finishes on the walls and ceilings, and designed the floor finish, a classic shellac and wax over new walnut flooring.
Here is the final image from before, as worked in Photomatix/Photoshop sometime in late 2009. Please bear in mind that I'm no HDR or Photoshop guru, so some of the issues I had may have been handily addressed by someone with more experience! [Click on any image to make it larger.]

As you can see from the above image, it was a very bright day. This image was processed in Photomatix Pro, then taken to Photoshop for further edits. No matter what I tried, though, I couldn't really address the light bleed coming in from the back doors and windows, nor the reflection of the same light on the new floors. Although I tried masking in various exposures, creating low-exposure layers, etc., I just couldn't tame the bleed, so I went with my best version, hoping that someday... someday...
Looks like I've finally solved my problem. Let's bring those same 9 RAW exposures into HDR Expose, using the 'Merge to HDR' function. The initial merge from HDR Expose looks like this:

Note that the persistent glow from the back windows remains.
Using a basic example from Unified Color's website, I'll set about tackling the light issue.
The first thing to notice -- and it is new -- is the histogram display. This histogram effectively shows you the dynamic range of the underlying image, but if you look carefully for the lighter gray band in the histogram, you'll see the dynamic range that can be displayed on most output devices, which, as we know, is limited today. This immediately tells you that although you can't see all the detail in the highlights and shadows, it IS there... it's just out of range at the moment. Using 0EV as the white point, we can see that there is information both above and below the range that can be displayed on your monitor.
The first thing we do is to lower the display brightness of the image. I'm doing this to determine at what point the "blown out" highlights display as I'd like to see them:

By using the display brightness slider, located in the bottom left of the window, we can lower the display brightness and see that the highlights are not truly blown out of the image. In a sense, this is like looking at one of the darker brackets taken on site. Note that this does not change the file in any way, but allows us to look into a variety of ranges of the file.
Now, knowing that -8EV brings the highlights into check, we first bring the brightness slider back up to 0EV, and then begin 32-bit processing, starting with the Brightness/Contrast settings:

Above, I've lowered the Brightness slider to -8.00EV, targeting the value that we saw when altering the display brightness. They kinda look the same, don't they?, but it's not much use to us in this form. You can also see from the histogram that most of the shadow area falls outside of the display range.
The next step is to lower the contrast power in the same dialog:

Lowering the Contrast Power in this way basically squashes the histogram, placing most, if not all, of the data within range of the display.
But, as you can see, the results look pretty flat. Crappy, even.
Did you really think we were done?
From here, we move into the Shadow/Highlight dialogue in order to bring back more information:

As you can see from the above, by altering the Midtone Point, Highlight Power, and Shadow Power sliders, we can begin to lighten up some of the darker shadows to a more reasonable level, as well as managing those pesky highlights. Tonally, at this point, the image is getting more toward 'reality' as my eyes saw the scene that day.
But is still looks bad. Almost as though the scattered light has created a veil over the entire image. As luck would have it, HDR Expose has a Veiling Glare function:

By setting Veiling Glare to -6EV and -100%, the entire image gets more sharp and clear, as though you have lifted, well, a veil from over the image. Veiling Glare is meant to take the stray light that bounces around the inside of your lens, causing bleed and scatter, and bring it under control. I've used this example exactly because of all the scattered light inherent in this image!
Now, since the image is still a bit dark, I've decided to go back to the Brightness/Contrast dialogue to adjust a bit further. This is also in line with the 'recipe' provided by Unified Color:

I boosted both the Brightness and the Contrast Power to bring back some light in the image. It was a very bright day, after all, and was well before the client hung the heavy, dark curtains in back.
Finally, I used HDR Expose's Sharpness function to bring a bit more clarity to the image, and I'll stop processing at this point:

Looking at the above image, I can tell you that we still have some work to do, but I wanted to make this relatively brief. In the above examples, I was deliberately ham-handed on some of the settings. You know how it goes: When you're in a rush, you just slam the sliders around until you get close to what you want. When you have more time, you can tweak the settings more carefully, and that's exactly what I'd do here.
HDR Expose has further functionality to help edit this baby. I'd probably look into the Color Tuning and White Point settings to more carefully adjust color balance, although that said, the room really does look a lot like what you see in the last example. Also, you may have noticed that there are anti-halo functions on some of the dialogues... as you increase Contrast Power, haloing tends to be introduced, so you can hit these sliders -- with varying degress of power -- to knock the halos back even further than you see here. There's even a "Maximum" setting for "Reduce Halo Artifact." How cool is that?
The astute amongst you may have noticed that as we added these edits (did I mention that we're working in 32-bit precison!?), they were stacked up on the right side under the histogram. This is a working history, and you can, at any time, go back into each dialogue to adjust settings, and then, if you like them, save the whole shebang out as a "recipe" for later use on similar images.
I'll certainly write a "second look" article when I can, because it occurs to me: What other things can we do if we combine assets? As I like to say, "The great thing about not knowing all the rules is that one can break them without compunction."
So now I'm thinking: Since the output from HDR Expose can be in 32-bit native .BEF format, or 32/16/8 bit TIF, or .HDR, or .EXR format, what would happen if we then took that output and fed it into other programs? Sure, we could take it to Photoshop for more 32-bit editing, or render it down to 16-bit and apply some filters (e.g., NIK, OnOne, Topaz, etc.), but what if we used... ???
Stay tuned. I have a really cool idea!
Cheers,
Rob
Friday, June 25, 2010
HDR "Shadowmapping"
Hi --
I realize that it's been a while since my last post, but hopefully this one will provide some benefit to you, making the wait worthwhile.
Specific recipes for tonemapping HDR images come up in conversation with friends, which alone tells you that I'm pretty much a photo-dork. While I almost always freely share the little that I know, there is one "secret" technique that I've held close to the chest. Until now. A friend of mine and a talented photographer, Reid Mason, passed along the words of a teacher he once had, "When you give away your very best secret weapon, you are forced to go find a new one."
So be it, then. It's a technique that I call "Shadowmapping", and I've had good success with it. Credit and thanks go to Christian Bloch for this technique, although I've made a few subtle changes to the original recipe.
Since this gets a little involved and screen shots are required, I'll get right to it with minimum verbiage. You can always contact me or leave comments if you have further questions.
For this example, we're going to tonemap a single RAW image that you may recognize as one of my favorites, Flagstaff Lake Sunrise, but there is no reason not to use multiple bracketed shots. In fact, it would likely be better to do so. Here is the original RAW image, rendered to JPG for this blog:
Some may say that it's good enough, or that with a little tweaking in Photoshop it could be great. For the post-processing addicted, however, it's never good enough!
The first thing we'll do is to use Photomatix Pro to create a psuedo-HDR out of this file. Use the "Batch Single Files" function for this, and do not perform any tonemapping -- just save the new radiance (.hdr) file in a folder. If you're using multiple brackets, create a radiance file in the usual way by merging the multiple exposures.
Note: For any of the images in this blog, you can click for a larger view.
The next step is to create several different tonemaps from that psuedo-HDR.
I always start with a tonemap at the Default settings, just to get a baseline for the image. It may not be necessary, but it only takes a few moments:

These settings result in:

The next tonemap is what I usually label as "Vivid." On this one, try cranking up Saturation, Luminosity, and Microcontrast. You really want it to be colorful, sharp, and wild. (Note: Please don't ever publish one of these as a standalone image! Your friends will stop talking to you.) Exact slider settings depend on the image, so feel free to play around. In this example, I raised Micro-smoothing in order to avoid grainy clouds.

From these settings, the Vivid output is:
Now comes the "secret" Shadowmap iteration.

Send the pseudo-HDR through tonemapping again, but drop the Saturation to 0, lower the Strength a bit, and set the White Point and Black Point to the maximum. You could also adjust the Black Clipping point. Tinker around with other settings at will; the intent is to get a super-high-contrast, black & white version of your image, highlighting all the shadows and highlights.
The resulting Shadowmap looks like:

Come to think of it, that would make a decent B&W version. Run with it, if that's where your artistic sensibilities take you.
Now comes the fun part: Load all three tonemaps -- Default, Vivid, and Shadowmap -- into Photoshop. While you're at it, you might want to call in the original RAW file in case you need some bits of it. (We won't for this example.) You could also include other tonemaps generated in order to highlight specific details. I prefer to load these images into separate tabs, rather than as layers... sometimes you won't even choose to use a given file once you see where things are going.
Moving to the Shadowmap file, copy the entire image (Cmd-A/Cmd-C on the Mac), the go to the Vivid tab and and paste it as a new layer over the Vivid tonemap (Cmd-V). Change the blending mode of the new Shadowmap layer to Hard Light and set the opacity of the that layer to about 40%. Clearly, no two images are alike, so you should feel free to play around with different blending modes and opacity settings.
This is where we're at with the above layer settings of Hard Light at 40%:

Again, we could probably stop there and have a decent image, but I think this one has a bit too much contrast, so we'll dial it back. This could probably be done by adjusting the opacity of the Shadowmap layer, but for illustrative purposes, I'll go get the Default tonemap by copying and pasting it as a new layer on top of the other two. Use Normal blending mode, and bring the Opacity down to about 30%. After that, we have:
The effect is subtle here, but the contrast is diminished a bit, and there's a bit more overall softness.
You should feel free to call in other files, or use other blending modes and opacities. You could even run your stacked image through other filters such as NIK Color Efex Pro, OnOne Phototools, or Topaz Adjust. It's your free time, after all.
Now all that is left are the finishing touches. When you get the image pretty much where you'd like it to be, run a noise-reduction pass (I use Imagenomic's Noiseware.) It could be argued that noise-reduction should have been done to each tonemap as a first step so as not to multiply artifacts. That, too, is your choice. Crop, if needed. Add any other adjustment layers such as Curves or Hue/Saturation to bring up or knock back specific colors, and then employ the Low Amount/High Radius Sharpening techniques that I wrote about in my previous post. In this case, both LAHR and then HALR settings were used to produce this "final" version:

So, there you have it. I would probably work this image a bit further in order to galvanize a few details (and indeed I did in my first version), but this is essentially the "Shadowmapping" technique. A far cry from the original RAW file, I'd say.
Please feel free to add to the discussion. If you decide to use this technique, I'd love to see the results you've had with it. As we all know, there is no "one size" for HDR, tonemapping, or post-processing, but this does illustrate a flow that I use frequently for those special images.
Live strong!
Rob
I realize that it's been a while since my last post, but hopefully this one will provide some benefit to you, making the wait worthwhile.
Specific recipes for tonemapping HDR images come up in conversation with friends, which alone tells you that I'm pretty much a photo-dork. While I almost always freely share the little that I know, there is one "secret" technique that I've held close to the chest. Until now. A friend of mine and a talented photographer, Reid Mason, passed along the words of a teacher he once had, "When you give away your very best secret weapon, you are forced to go find a new one."
So be it, then. It's a technique that I call "Shadowmapping", and I've had good success with it. Credit and thanks go to Christian Bloch for this technique, although I've made a few subtle changes to the original recipe.
Since this gets a little involved and screen shots are required, I'll get right to it with minimum verbiage. You can always contact me or leave comments if you have further questions.
For this example, we're going to tonemap a single RAW image that you may recognize as one of my favorites, Flagstaff Lake Sunrise, but there is no reason not to use multiple bracketed shots. In fact, it would likely be better to do so. Here is the original RAW image, rendered to JPG for this blog:
Some may say that it's good enough, or that with a little tweaking in Photoshop it could be great. For the post-processing addicted, however, it's never good enough!
The first thing we'll do is to use Photomatix Pro to create a psuedo-HDR out of this file. Use the "Batch Single Files" function for this, and do not perform any tonemapping -- just save the new radiance (.hdr) file in a folder. If you're using multiple brackets, create a radiance file in the usual way by merging the multiple exposures.
Note: For any of the images in this blog, you can click for a larger view.
The next step is to create several different tonemaps from that psuedo-HDR.
I always start with a tonemap at the Default settings, just to get a baseline for the image. It may not be necessary, but it only takes a few moments:

These settings result in:

The next tonemap is what I usually label as "Vivid." On this one, try cranking up Saturation, Luminosity, and Microcontrast. You really want it to be colorful, sharp, and wild. (Note: Please don't ever publish one of these as a standalone image! Your friends will stop talking to you.) Exact slider settings depend on the image, so feel free to play around. In this example, I raised Micro-smoothing in order to avoid grainy clouds.

From these settings, the Vivid output is:

Now comes the "secret" Shadowmap iteration.

Send the pseudo-HDR through tonemapping again, but drop the Saturation to 0, lower the Strength a bit, and set the White Point and Black Point to the maximum. You could also adjust the Black Clipping point. Tinker around with other settings at will; the intent is to get a super-high-contrast, black & white version of your image, highlighting all the shadows and highlights.
The resulting Shadowmap looks like:

Come to think of it, that would make a decent B&W version. Run with it, if that's where your artistic sensibilities take you.
Now comes the fun part: Load all three tonemaps -- Default, Vivid, and Shadowmap -- into Photoshop. While you're at it, you might want to call in the original RAW file in case you need some bits of it. (We won't for this example.) You could also include other tonemaps generated in order to highlight specific details. I prefer to load these images into separate tabs, rather than as layers... sometimes you won't even choose to use a given file once you see where things are going.
Moving to the Shadowmap file, copy the entire image (Cmd-A/Cmd-C on the Mac), the go to the Vivid tab and and paste it as a new layer over the Vivid tonemap (Cmd-V). Change the blending mode of the new Shadowmap layer to Hard Light and set the opacity of the that layer to about 40%. Clearly, no two images are alike, so you should feel free to play around with different blending modes and opacity settings.
This is where we're at with the above layer settings of Hard Light at 40%:

Again, we could probably stop there and have a decent image, but I think this one has a bit too much contrast, so we'll dial it back. This could probably be done by adjusting the opacity of the Shadowmap layer, but for illustrative purposes, I'll go get the Default tonemap by copying and pasting it as a new layer on top of the other two. Use Normal blending mode, and bring the Opacity down to about 30%. After that, we have:
The effect is subtle here, but the contrast is diminished a bit, and there's a bit more overall softness.
You should feel free to call in other files, or use other blending modes and opacities. You could even run your stacked image through other filters such as NIK Color Efex Pro, OnOne Phototools, or Topaz Adjust. It's your free time, after all.
Now all that is left are the finishing touches. When you get the image pretty much where you'd like it to be, run a noise-reduction pass (I use Imagenomic's Noiseware.) It could be argued that noise-reduction should have been done to each tonemap as a first step so as not to multiply artifacts. That, too, is your choice. Crop, if needed. Add any other adjustment layers such as Curves or Hue/Saturation to bring up or knock back specific colors, and then employ the Low Amount/High Radius Sharpening techniques that I wrote about in my previous post. In this case, both LAHR and then HALR settings were used to produce this "final" version:

So, there you have it. I would probably work this image a bit further in order to galvanize a few details (and indeed I did in my first version), but this is essentially the "Shadowmapping" technique. A far cry from the original RAW file, I'd say.
Please feel free to add to the discussion. If you decide to use this technique, I'd love to see the results you've had with it. As we all know, there is no "one size" for HDR, tonemapping, or post-processing, but this does illustrate a flow that I use frequently for those special images.
Live strong!
Rob
Tuesday, June 8, 2010
Sharpening Images - LAHR and HALR
Not too long ago, I discovered a new sharpening technique (new for me, anyway) that has added a lot of boost to some of my images.
At the end of post-processing we usually consider sharpening an image, often using Photoshop's Unsharp Mask function, and when we do, it's often using HILR (high amount, low radius.) As an example, you may choose to apply an Unsharp Mask at 100-150% with a radius of 0.8-1.2.
Try this:
Create a new layer from your background layer -- it's easier to undo or adjust opacity later. Call it 'LAHR'. On that layer, bring up Unsharp Mask, but go with a low amount (say, 25%) and a high radius (say, 30 pixels.) Obviously, there is no set formula and you'll want to play around with the sliders while you get used to this technique.
You should notice not only a bit of sharpening, but more obviously, a boost in apparent contrast. I've noticed deeper and richer shadows using this technique. Feel free to not only adjust the sliders, but to adjust the opacity of that LAHR layer until it suits your tastes, and, of course, don't overdo it! Keep it real, man.
Why stop there?
Create another layer on top and apply Unsharp Mask in the usual manner, with HALR. In discussions with my Flickr friend "Mister Joe", LAHR and HALR do two different things, and there's no reason they can't be used in combination...
... and in moderation.
If you've read this and have tried it to good success, please drop a comment with a "Yo." I just like to share the Photoshop love...
Cheers!
Rob
Saturday, June 5, 2010
Why I Like HDR, Tonemapping, and Post-Processing
Some people ask why I bother with HDR techniques, tonemapping, and post-processing. After all, it can take hours to come up with one, good final image. Is it worth it?
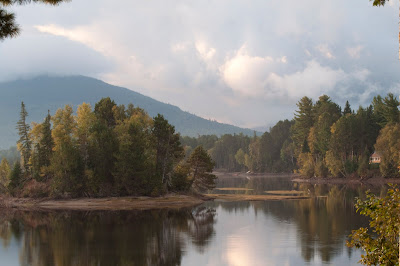
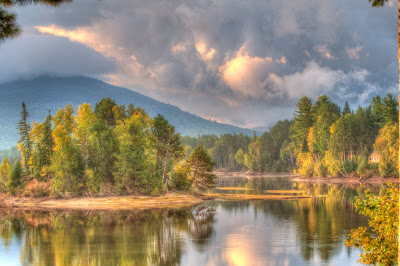
Here's my answer, from an image captured in Maine in 2009:
Before - A RAW file (NEF) straight from the camera, converted to JPEG format for web display.
After - The same shot, where I fooled around with LAB color, shadow-mapping, tonemapping, detail adjustments, straightening, cloning, and sharpening.
Click on either image for a larger display.


While the second image is FAR from perfect (it was a quick pass), the differences are easy to see.
As Forrest Gump would say, "That's all I have to say about that."
Cheers!
Thursday, June 3, 2010
Aperture 3 Install - "Do What They Say..."
~
Recently (early June, 2010), I finally got the nerve to upgrade from Apple's Aperture 2 to Aperture 3. Even though I waited for Apple to address the inevitable user issues that crop up on initial releases, I was still a bit nervous about the install of 3.0.3. After all, I'm just a guy, isolated here in the wilds of North Carolina, with no Apple store in sight, and I'm running on an aging MacBook Pro -- a beefed up aging MacBook Pro, mind you, but an MBP nonetheless.
Any time we do research on something like this, it gets a little nerve-wracking. No one who relies on their rig for their livelihood should steadfastly believe, "It Just Works", no matter how much we'd like to do so. Why can't we just install? Who has the time to find out how the release is perceived in the wild? You do.
Reviews and reports on a new release tend to fall into two different -- and often wildly disparate -- camps, it seems to me.
One camp has the "professional" or well-known writers. These are the people who always seem to be on the leading edge of new releases and equipment. They have a long list of friends and toys, and, no doubt, an office full of fantastic gear that would support just about anything. There are hundreds of these people out there, and most tend to give reliable information. Their opinion certainly shouldn't be discounted, and I thank them very much for all they've done.
The other great sources of information are user forums and support boards, most notably Apple's own support forums. On this, I'm of a split mind: These boards have saved my bacon on any number of occasions, but... this is where you will hear every horror story about a new release, and it can scare the f-f-f-fire out of you. To compile a list of every little nit and major catastrophe that has befallen a user is to come to the conclusion that the release is a piece of trash. Some phrase it far less mildly.
The support forums and other bulletin boards are sort of like watching the evening news: How often do we hear about the good deeds done on a given day, given a mindset where the credo is, "If it bleeds, it leads." It's understandable. People come to the boards to solve a major problem, not to crow about how smoothly everything went, although there are a few of those.
I'm one of them. With a caveat...
Everything went very smoothly on my upgrade and afterward, but I spent a lot of time getting ready for it. Perhaps it was only the time that I spent that helped with the success of the project. We'll never know for sure.
For any major release of software, and particularly when one can't afford to be down and out for any length of time, it pays to carefully clear the way for the installation, and to have a fallback plan. Please don't assume that you can just drop in the CD and let 'er rip, even though the temptation to play with new toys runs very high. (I know, I know...) Aperture is a beast. Your library of images is huge. If you're a pro, you NEED this to go well, and a quick read of the Apple support boards will show that, for a number of people, things did not go well at all.
Enough with the rhetoric. We're all busy. Here's what I did:
1) First, brush up your A2 library. Clear out your culls. Get rid of anything you don't need, including old projects, books, light tables, and albums that are no longer necessary or wanted. If you have the time, run through some albums and clear out stuff that you now realize you'll likely never come back to. (Just don't go too crazy. We don't want any regrets later.) This is all well worth the time, as your tank will be just that bit cleaner.
Note: After doing this, you may want to Vault your library.
2) Close Aperture 2 and restart it using the Command-Option start. Keep holding those keys down until you get the splash screen, or it won't work. From the next dialog, you can choose to either Repair or Rebuild your library. At a minimum, Repair to fix up permissions. To get a bit more retentive, you could Rebuild. This should ensure that your library has full integrity, which is surely important to the upgrade process.
3) CHECK YOUR LIBRARY after the Repair or Rebuild. Ya never know.
4) When done, Vault the library. In my case, I created two separate Vaults on two external drives, but I do that as part of my usual workflow anyway.
5) Some people have recommended doing a Restore of your library from a Vault to ensure that there are no problems. I didn't do this, and I probably should have. I guess I just had faith in this area, since by all indications there were no problems with the library.
6) Avoid the temptation to do anything else with A2 while you make a clone of your hard drive. I recommend Carbon Copy Cloner. It does a fantastic job of making a copy of your drive on an external disk partition, bootable to OS X just as you left it. Priceless.
7) Good to go? Install Aperture 3. It doesn't take long.
8) Start Aperture 3. Around this point, Aperture will look for existing libraries, giving you the option of firing those up. Don't do it. I would recommend creating a new library on the disk of your choice, for two reasons. First, I like to start "clean" whenever I can, rather than having Aperture convert a library in place (you did know it has to convert your entire library, right?) and second, this give you the opportunity to...
9) Turn off Faces and turn off Places. You can always run those later. Faces, especially, is where many people have had their computer pretty much lock up on them for hours on end. Places? For me, I have to wait for my next birthday and the GPS unit.
10) Okay, A3 is up. You have a new library container started. Faces & Places are turned off. You could methodically import projects on a one-by-one basis, but life isn't for the meek: I imported my entire A2 library into A3 en masse. I figured that with all those backup copies and clones, I might as well.
Hours -- many hours -- later, the process was complete. It might have taken longer because my library is on a 2TB FW800 external rather than the hard drive. I just set the MacBook Pro on the table, turned a small fan on it, and let it do its thing. I imported/converted almost 17,000 images (about half RAW, half JPG) into the new library. Be sure to click on the Processing indicator to get more specific information about what's going on.
Sure, it took a while, but it got done. Afterward, since I was on a bit of a roll, I turned on Faces and let it run overnight. Honestly, I don't know how long that took, but it was ready by the time I woke up. (Not that it works all that well, mind you. As I 'confirmed faces' against a known 'Rob' photo, I was amazed at how many other faces were assigned to my name. The nerve...)
Now this may sound like a lot of work, but I slept well at night knowing that I had a good backup plan. And yes, it was a pain and took a couple of days to get everything set up, but I can now proudly say:
"I installed Aperture 3 on a MacBook Pro, and I have not had a single problem."
~
Wednesday, June 2, 2010
Intentionality
Greetings, and welcome!
Please let me tell you what this space is all about, and of my intentions going forward with this project:
Though I had been working in the computer field for many years, I successfully resisted most forms of 'social networking' and electronic interaction, save for email. It's not that I'm anti-social -- quite to the contrary -- but I've always sensed a distance, or disconnect, with most electronic communication. I'd far rather have a personal, face-to-face conversation, or at the very least, a one-on-one email exchange with someone. But, there just aren't enough hours in the day anymore, so I hope this will be a place where I can share a few things that I find interesting or useful.
My presence on the web these days tends to be in the field of photography. I have a bit of a presence on Flickr and recently created a photography web site, my first site ever, at RobHansonPhoto.com. Now, this.
While I produce many images that are single-exposure frames, I have a great interest in High Dynamic Range (HDR) photography, as a quick look at my website will show. HDR imaging allows us to see the world via a camera, capturing an image as we always have, but does so in a way that is closer to how our eyes actually see a scene. More on that later, to be sure.
A number of people have asked me to share some of the things I've discovered along the way, and I do so quite willingly. If it weren't for other photographers sharing what they know, I wouldn't be able to accomplish half of what I do. I owe these generous people a debt of gratitude.
I'm not at all worried about sharing "secrets." The beauty of the endeavor is this: Two of us can use the same camera, at the same event, standing side-by-side, shooting the same scene. I guarantee that the result will be two completely different final images, and if they are somehow the same, it'll be a fluke. Once the scene has hit the camera's sensor all bets are off, because post-processing can take the image in a thousand different directions.
I rue the day that cameras shoot HDR directly, and that day is coming soon. I think that'll take a lot of the creative process away, and yet I have hope that we'll still be able to innovate, adapt, and find new ways of expressing our creative potential.
My intentions are:
- To share my photographic vision.
- To connect with others.
- To have a creative writing venue. If a picture is worth a thousand words, why not combine the two?
My best wishes to you, and happy shooting!
Rob
Subscribe to:
Posts (Atom)


