
I realize that it's been a while since my last post, but hopefully this one will provide some benefit to you, making the wait worthwhile.
Specific recipes for tonemapping HDR images come up in conversation with friends, which alone tells you that I'm pretty much a photo-dork. While I almost always freely share the little that I know, there is one "secret" technique that I've held close to the chest. Until now. A friend of mine and a talented photographer, Reid Mason, passed along the words of a teacher he once had, "When you give away your very best secret weapon, you are forced to go find a new one."
So be it, then. It's a technique that I call "Shadowmapping", and I've had good success with it. Credit and thanks go to Christian Bloch for this technique, although I've made a few subtle changes to the original recipe.
Since this gets a little involved and screen shots are required, I'll get right to it with minimum verbiage. You can always contact me or leave comments if you have further questions.
For this example, we're going to tonemap a single RAW image that you may recognize as one of my favorites, Flagstaff Lake Sunrise, but there is no reason not to use multiple bracketed shots. In fact, it would likely be better to do so. Here is the original RAW image, rendered to JPG for this blog:
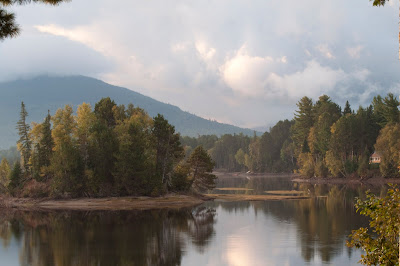
Some may say that it's good enough, or that with a little tweaking in Photoshop it could be great. For the post-processing addicted, however, it's never good enough!
The first thing we'll do is to use Photomatix Pro to create a psuedo-HDR out of this file. Use the "Batch Single Files" function for this, and do not perform any tonemapping -- just save the new radiance (.hdr) file in a folder. If you're using multiple brackets, create a radiance file in the usual way by merging the multiple exposures.
Note: For any of the images in this blog, you can click for a larger view.
The next step is to create several different tonemaps from that psuedo-HDR.
I always start with a tonemap at the Default settings, just to get a baseline for the image. It may not be necessary, but it only takes a few moments:

These settings result in:

The next tonemap is what I usually label as "Vivid." On this one, try cranking up Saturation, Luminosity, and Microcontrast. You really want it to be colorful, sharp, and wild. (Note: Please don't ever publish one of these as a standalone image! Your friends will stop talking to you.) Exact slider settings depend on the image, so feel free to play around. In this example, I raised Micro-smoothing in order to avoid grainy clouds.

From these settings, the Vivid output is:

Now comes the "secret" Shadowmap iteration.

Send the pseudo-HDR through tonemapping again, but drop the Saturation to 0, lower the Strength a bit, and set the White Point and Black Point to the maximum. You could also adjust the Black Clipping point. Tinker around with other settings at will; the intent is to get a super-high-contrast, black & white version of your image, highlighting all the shadows and highlights.
The resulting Shadowmap looks like:

Come to think of it, that would make a decent B&W version. Run with it, if that's where your artistic sensibilities take you.
Now comes the fun part: Load all three tonemaps -- Default, Vivid, and Shadowmap -- into Photoshop. While you're at it, you might want to call in the original RAW file in case you need some bits of it. (We won't for this example.) You could also include other tonemaps generated in order to highlight specific details. I prefer to load these images into separate tabs, rather than as layers... sometimes you won't even choose to use a given file once you see where things are going.
Moving to the Shadowmap file, copy the entire image (Cmd-A/Cmd-C on the Mac), the go to the Vivid tab and and paste it as a new layer over the Vivid tonemap (Cmd-V). Change the blending mode of the new Shadowmap layer to Hard Light and set the opacity of the that layer to about 40%. Clearly, no two images are alike, so you should feel free to play around with different blending modes and opacity settings.
This is where we're at with the above layer settings of Hard Light at 40%:

Again, we could probably stop there and have a decent image, but I think this one has a bit too much contrast, so we'll dial it back. This could probably be done by adjusting the opacity of the Shadowmap layer, but for illustrative purposes, I'll go get the Default tonemap by copying and pasting it as a new layer on top of the other two. Use Normal blending mode, and bring the Opacity down to about 30%. After that, we have:
The effect is subtle here, but the contrast is diminished a bit, and there's a bit more overall softness.
You should feel free to call in other files, or use other blending modes and opacities. You could even run your stacked image through other filters such as NIK Color Efex Pro, OnOne Phototools, or Topaz Adjust. It's your free time, after all.
Now all that is left are the finishing touches. When you get the image pretty much where you'd like it to be, run a noise-reduction pass (I use Imagenomic's Noiseware.) It could be argued that noise-reduction should have been done to each tonemap as a first step so as not to multiply artifacts. That, too, is your choice. Crop, if needed. Add any other adjustment layers such as Curves or Hue/Saturation to bring up or knock back specific colors, and then employ the Low Amount/High Radius Sharpening techniques that I wrote about in my previous post. In this case, both LAHR and then HALR settings were used to produce this "final" version:

So, there you have it. I would probably work this image a bit further in order to galvanize a few details (and indeed I did in my first version), but this is essentially the "Shadowmapping" technique. A far cry from the original RAW file, I'd say.
Please feel free to add to the discussion. If you decide to use this technique, I'd love to see the results you've had with it. As we all know, there is no "one size" for HDR, tonemapping, or post-processing, but this does illustrate a flow that I use frequently for those special images.
Live strong!
Rob


Excellent tutorial and options. I think every image has different best result and this process described produces great results. I have done some B&W plus other versions and then layered them for very interesting effects too. Your refinement of this technique and its documentation here is welcome and very valuable! Thanks for sharing!!!!
ReplyDeleteHey Rob.. excellent job on the tutorial and the blog looks great!
ReplyDeleteI'll be adding this technique to my arsenal.
Well done!
Richard
Terrific post Rob! I will most definately be giving this a try.
ReplyDeleteSo, how's it going on your quest for a new Secret Weapon?
Reid Mason
Mason Photographics
Hi Rob,
ReplyDeleteJust got your message on twitter cant wait to have a play with this thanks so much for taking the time to put it together, I have a photo in mind to try this on (one I took @ 5am this morning) I will upload to flickr once I am happy with it. http://www.flickr.com/ffotograffiaeth/
Thanks again
Ant :-)
It's about Time! Sheeeesh!
ReplyDeleteHi Rob,
ReplyDeleteThanks for the great post. The workflow presented here is very easy to follow, even for the novice like my self and the results are fantastic.
Again thanks for sharing. below is the link to the 2 fiat pictures i applied your technique to.
http://www.flickr.com/photos/leaf_fan_in_ottawa/